Hexo+Next主题的一些实用插件和美化升级
一些实用技巧记录,随时更新
添加右上角图标folk github
-
找到自己喜欢的样式:http://tholman.com/github-corners/, 并复制代码
-
打开: E:\Blog\themes\next\layout\_layout.njk,添加
<div class="headband"></div>
<!--下面一行插入复制代码,注意换成自己的github地址:href="https://github.com/a171232886"-->
<a href="https://github.com/a171232886" class="github-corner" aria-label="View source on GitHub"><svg width="80" height="80" viewBox="0 0 250 250" style="fill:#151513; color:#fff; position: absolute; top: 0; border: 0; right: 0;" aria-hidden="true"><path d="M0,0 L115,115 L130,115 L142,142 L250,250 L250,0 Z"></path><path d="M128.3,109.0 C113.8,99.7 119.0,89.6 119.0,89.6 C122.0,82.7 120.5,78.6 120.5,78.6 C119.2,72.0 123.4,76.3 123.4,76.3 C127.3,80.9 125.5,87.3 125.5,87.3 C122.9,97.6 130.6,101.9 134.4,103.2" fill="currentColor" style="transform-origin: 130px 106px;" class="octo-arm"></path><path d="M115.0,115.0 C114.9,115.1 118.7,116.5 119.8,115.4 L133.7,101.6 C136.9,99.2 139.9,98.4 142.2,98.6 C133.8,88.0 127.5,74.4 143.8,58.0 C148.5,53.4 154.0,51.2 159.7,51.0 C160.3,49.4 163.2,43.6 171.4,40.1 C171.4,40.1 176.1,42.5 178.8,56.2 C183.1,58.6 187.2,61.8 190.9,65.4 C194.5,69.0 197.7,73.2 200.1,77.6 C213.8,80.2 216.3,84.9 216.3,84.9 C212.7,93.1 206.9,96.0 205.4,96.6 C205.1,102.4 203.0,107.8 198.3,112.5 C181.9,128.9 168.3,122.5 157.7,114.1 C157.9,116.9 156.7,120.9 152.7,124.9 L141.0,136.5 C139.8,137.7 141.6,141.9 141.8,141.8 Z" fill="currentColor" class="octo-body"></path></svg></a><style>.github-corner:hover .octo-arm{animation:octocat-wave 560ms ease-in-out}@keyframes octocat-wave{0%,100%{transform:rotate(0)}20%,60%{transform:rotate(-25deg)}40%,80%{transform:rotate(10deg)}}@media (max-width:500px){.github-corner:hover .octo-arm{animation:none}.github-corner .octo-arm{animation:octocat-wave 560ms ease-in-out}}</style>
添加站内搜索
一个实用的NexT指导网站
- 安装
npm install hexo-generator-searchdb --save- 编辑E:\Blog\ _config.yml,任意位置新增
search:
  path: search.xml
  field: post
  format: html
limit: 10000- 编辑E:\Blog\themes\next\_config.yml,修改
# Local search
local_search:
  enable: true
主页显示项目
- 编辑E:\Blog\themes\next\_config.yml,修改
menu:
  home: / || fa fa-home
  #tags: /tags/ || fa fa-tags
  categories: /categories/ || fa fa-th
  archives: /archives/ || fa fa-archive
  about: /about/ || fa fa-user
  #schedule: /schedule/ || fa fa-calendar
  #sitemap: /sitemap.xml || fa fa-sitemap
#commonweal: /404/ || fa fa-heartbeat- 新建相应文件,比如categories
hexo new page categories- 修改categories\index.md
---
title: 分类
date: 2021-11-08 20:06:58
type: 'categories'
---
moon-cake 进度显示和上下滑动
- 下载,官方链接
npm install hexo-cake-moon-menu- 编辑E:\Blog\themes\next\_config.yml,添加
moon_menu:
  back2top:
    enable: true
    icon: fas fa-chevron-up
    order: -1
  back2bottom:
    enable: true
    icon: fas fa-chevron-down
    order: -2
代码颜色
包括了种类,预览效果和使用方式。
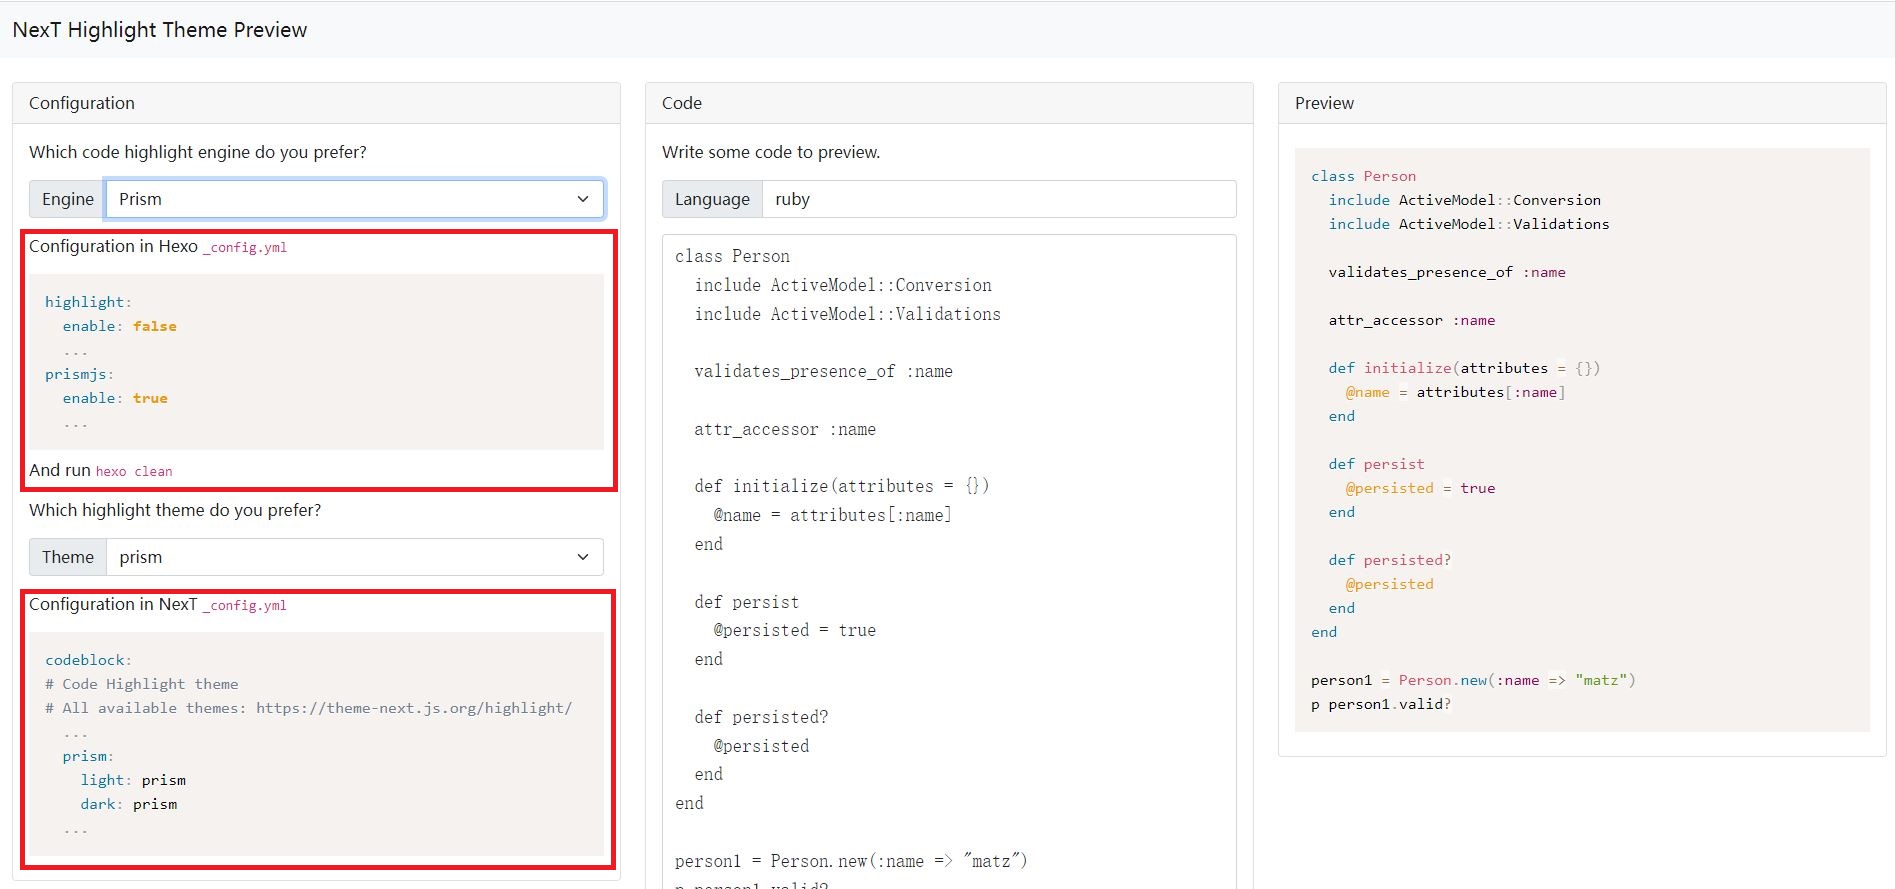
- 首先修改 Hexo的 _config.yml
- 再修改 NexT的 _config.yml
- 执行
hexo clean,再hexo g
首页只显示文章摘要
以前那种每页显示固定字数的选项没了,现在手动设置:
- 整体设置 NexT的 _config.yml
将excerpt_description: true设为true - 在每个文章中插入
<!--more-->,然后首页只显示该行以上的部分。
NexT8动画背景Canvas Nest
添加图片作为背景,但找不到合适的图片。NexT8自带的Canvas ribbon,每次点击背景变化过大,不太好。找来找去,就Nest挺合适,但NexT8已经不在集成Nest效果。
这部分完全转载自blog - hexo NexT主题下配置和美化,实测有效。
- 首先在hexo目录下安装动画库:
cd themes/next
git clone https://github.com/theme-next/theme-next-canvas-nest source/lib/canvas-nest- 在next主题下的_config.yml找到canvas_ribbon,在下面添加Canvas-nest动画的配置
# Canvas-nest
# Dependencies: https://github.com/theme-next/theme-next-canvas-nest
canvas_nest:
  enable: true
  onmobile: true # display on mobile or not
  color: "0,0,255" # RGB values, use ',' to separate
  opacity: 0.5 # the opacity of line: 0~1
  zIndex: -1 # z-index property of the background
count: 99 # the number of lines- 在博客根目录下的source文件夹,创建_data文件夹
cd source
mkdir _data- 创建footer.swig文件,添加内容
<script color="0,0,255" opacity="0.5" zIndex="-1" count="99" src="https://cdn.jsdelivr.net/npm/canvas-nest.js@1/dist/canvas-nest.js"></script>- 在next主题下的_config.yml找到_config.yml中找到custom_file_path添加一行配置
footer: source/_data/footer.swig
# Define custom file paths.
# Create your custom files in site directory `source/_data` and uncomment needed files below.
custom_file_path:
  #head: source/_data/head.njk
  #header: source/_data/header.njk
  #sidebar: source/_data/sidebar.njk
  #postMeta: source/_data/post-meta.njk
  #postBodyEnd: source/_data/post-body-end.njk
  #footer: source/_data/footer.njk
  footer: source/_data/footer.swig
  #bodyEnd: source/_data/body-end.njk
  #variable: source/_data/variables.styl
  #mixin: source/_data/mixins.styl
#style: source/_data/styles.styl- 重启hexo
hexo clean
hexo g
hexo s
修改链接样式
对./themes/next/source/css/_common/components/post/post-body.styl最后添加内容:
.post-body a {
  color: #428BCA;
  font-weight: bold;
}
LaTeX公式编辑问题
研究了好久,决定还是使用mathjax,其实KaTeX也挺好的。
- 卸载默认的marked,安装新的pandoc
npm un hexo-renderer-marked
npm i hexo-renderer-pandoc-
设置next下的_config.yml,将
mathjax启用mathjax: enable: true # Available values: none | ams | all tags: none -
注意:Hexo下的Mathjax没有那么智能,整体公式写法尽量简单,能少加括号的就少加。否则会出现Mathjax官方可以识别出来,但是Hexo编译不出来的情况。
-
mathjax官方demo,可以在上面试试公式
-
尽管mathjax遵循LaTeX语法,但有可能还会出现一些不同的地方。这有两个参考:
使用mermaid绘制流程图
npm install --save hexo-filter-mermaid-diagrams修改NexT的_config.yml
# Mermaid tag
mermaid:
  enable: true
  # Available themes: default | dark | forest | neutral
  theme:
    light: default
    dark: dark
mermaid的flowchart基础语法
  <pre class="mermaid">  flowchart LR
    subgraph TOP
      direction TB
      subgraph B1
          direction RL
          i1 -->f1
      end
      subgraph B2
          direction BT
          i2 -->f2
      end
    end
    A --> TOP --> B
    B1 --> B2</pre>


<pre class="mermaid">  flowchart LR
    subgraph TOP
      direction TB
      subgraph B1
          direction RL
          i1 -->f1
      end
      subgraph B2
          direction BT
          i2 -->f2
      end
    end
    A --> TOP --> B
    B1 --> B2</pre>

# 访客统计
next的_config.yml中busuanzi_count的enable设为true即可。
```yml
# Show Views / Visitors of the website / page with busuanzi.
# For more information: http://ibruce.info/2015/04/04/busuanzi/
busuanzi_count:
  enable: true
  total_visitors: true
  total_visitors_icon: fa fa-user
  total_views: true
  total_views_icon: fa fa-eye
  post_views: true
  post_views_icon: far fa-eye
文章目录相关
默认展开
如果文章内容是多级目录,默认二级目录是合并的。这样给阅读带来不便,可设置为默认展开。
next的_config.yml中toc的expand_all设为true
toc:
  enable: true
  # Automatically add list number to toc.
  number: true
  # If true, all words will placed on next lines if header width longer then sidebar width.
  wrap: false
  # If true, all level of TOC in a post will be displayed, rather than the activated part of it.
  expand_all: true
  # Maximum heading depth of generated toc.
  max_depth: 6
取消自动编号
number: false
每行目录显示全部
wrap: true,此时每行过长的目录标题会转行显示。
网站运行天数
在.\themes\next\layout\_partials\footer.njk最后添加,注意修改var grt= new Date("12/1/2021 00:00:00");中的时间。
<div>
<span id="timeDate">载入天数...</span><span id="times">载入时分秒...</span>
<script>
    var now = new Date();
    function createtime() {
        var grt= new Date("12/1/2021 00:00:00");
        now.setTime(now.getTime()+250);
        days = (now - grt ) / 1000 / 60 / 60 / 24; dnum = Math.floor(days);
        hours = (now - grt ) / 1000 / 60 / 60 - (24 * dnum); hnum = Math.floor(hours);
        if(String(hnum).length ==1 ){hnum = "0" + hnum;} minutes = (now - grt ) / 1000 /60 - (24 * 60 * dnum) - (60 * hnum);
        mnum = Math.floor(minutes); if(String(mnum).length ==1 ){mnum = "0" + mnum;}
        seconds = (now - grt ) / 1000 - (24 * 60 * 60 * dnum) - (60 * 60 * hnum) - (60 * mnum);
        snum = Math.round(seconds); if(String(snum).length ==1 ){snum = "0" + snum;}
        document.getElementById("timeDate").innerHTML = "本站已安全运行 "+dnum+" 天 ";
        document.getElementById("times").innerHTML = hnum + " 小时 " + mnum + " 分 " + snum + " 秒";
    }
setInterval("createtime()",250);
</script>
</div>
网页底部去掉“强力驱动”
比如想去掉“由 Hexo & NexT.Gemini 强力驱动”,在.\themes\next\layout\_partials\footer.njk中将以下代码注释掉。
{%- if theme.footer.powered %}
  <div class="powered-by">
    {%- set next_site = 'https://theme-next.js.org' if theme.scheme === 'Gemini' else 'https://theme-next.js.org/' + theme.scheme | lower + '/' %}
    {{- __('footer.powered', next_url('https://hexo.io', 'Hexo') + ' & ' + next_url(next_site, 'NexT.' + theme.scheme)) }}
  </div>
{%- endif %}
但我认为Hexo和NexT应该在我的网页上留有名字,毕竟帮了我很大忙,于是将其放在了友情链接中。
友情链接的设置
next的_config.yml中Blog rolls进行设置
# Blog rolls
links_settings:
  icon: fa fa-globe
  title: 友情链接
  # Available values: block | inline
  layout: inline

  links:
  Hexo: https://hexo.io
  NexT: https://theme-next.js.org/
社交链接添加图标
添加社交连接
在next的_config.yml中social中进行设置。
social:
  GitHub: https://github.com/a171232886 || fab fa-github
  CSDN: https://blog.csdn.net/a171232886 || fa fa-book-open

social_icons:
  enable: true
  icons_only: false
  transition: false
添加图标
添加的图标应该是Font Awesome这里面已经有的图标。找到合适的图标,复制代码在上面||后直接时候即可。注意不要删掉原有的fa或者fab。
头像设置
在next的_config.yml中avatar设置。将头像图片放在./source/images/中,修改url地址。
# Sidebar Avatar
avatar:
  # Replace the default image and set the url here.
  url: /images/header.jpg
  # If true, the avatar will be displayed in circle.
  rounded: true
  # If true, the avatar will be rotated with the cursor.
  rotated: true